What is the Function of Switch in Networking
Network switches have been an indispensable component in corporate or data center networking. However, faced with the question that what the exact function of
What Is the Network Switch
The network switch in networking is a small hardware device that can be regarded as a network bridge with multi-ports, centrally addressing communications among all sort of connected devices, like servers, PCs, and access points within one local area network (LAN).

Figure 1: Network Switches in NetWorking
Types of the Network Switches
As shown in the market, there is a wide range of switches in the market. If you want to figure them out, you should bear in mind with clear criteria. With different standards, types of the switch are matched differently. For example, based on the transmitting rapid, you can get subbranches, like fast Ethernet switch, Gigabit Ethernet switch, 10Gigabit switch, etc. When looking at the configuration options, unmanaged switch
Unmanaged Switch
In networking, an unmanaged switch is used to achieve basic connectivity without any configuration interface or options. Just plug them in, they will work. Mostly, they
Managed Switch
Comparing with an unmanaged switch, the managed switch, also called smart switches, gives users more flexibility to configure switches as they need. Surely, it brings greater security and targeted networking to users. It supports many management interfaces, like Web UI, CLI, or both. The configuration of VLAN is the common application for a managed switch. For this type, 10gbe switch, 40gbe switch and 100gbe switch are the common choices.
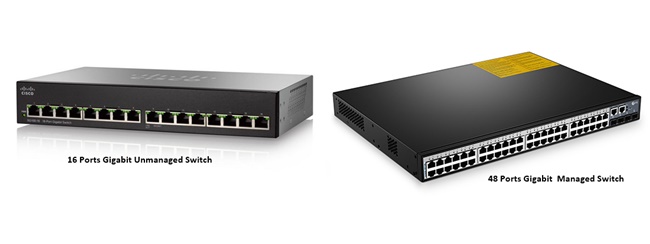
Figure 2: Unmanaged Switch (Left) and Managed Switch (Right)
The Function of Switch in Networking
No matter in your home or small offices, the network switch seems to be ubiquitous in network applications. For people outside the industry, you may wonder what the switch function is or what the benefits will the network switch brings about. Here, the main function of
- Saving cost. Running cables to industrial Ethernet nodes one by one, it’s a huge cost and even unreliable. Therefore, the switch can be a cost-effective choice in
wiring . - Easy installation. Without the need for the climate controlled enclosure, switch installation will be easier and more convenient.
- Low latency. When the transmission of network packet between the source device and target device has low latency, the time will be saved.
- Eliminating collision. With specified ports of the network switches, the access of the data packet sent by different devices will be spotted faster and targeted transmitted to the matching devices without unnecessary collision.
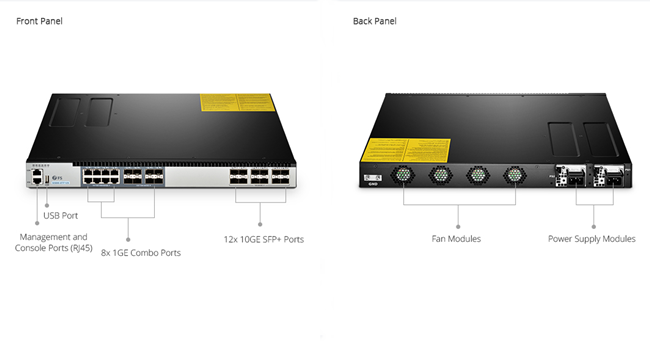
Figure 3: Front and Back Panel Overview of S5800-8TF12S Fully-Managed Switch
Summary
As an essential component in network cabling, the function of
Ethernet Cable Management Solutions
Ethernet cable management, also called network cable management, has been a necessary part for any structured cabling system. However, do you know why Ethernet cable management is needed and how many wire management ways can be exerted, and what their differences are? To know the answers, you can follow this post.
Why Need Ethernet Cable Management?
With a large number of input and output patch cords in racks or cabinets, the patch cord management can effectively provide a stable cabling system for applications of the data center. It can help to prevent unnecessary cable damages and dust, improve cooling and airflow, reduce signal interference and downtime, save space and cost, etc. In most cases, the solution to Ethernet cable managing relies on organizing devices, like patch panels and cable organizers.
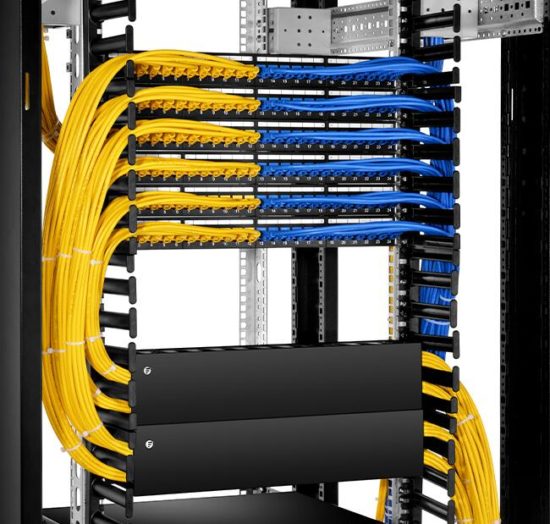
Figure 1: Ethernet Cable Management Solutions
Ethernet Cable Management Ways
Customarily, based on how you use network cable organizing devices, the way to manage network cables can be divided into two types: horizontal cable management and vertical cable management. Surely, depending on specified network conditions and special needs, you are allowed to choose the matching type. Sometimes, it’s still possible for you to apply these two types together in cabling.
Horizontal Cable Management
In Ethernet cabling, horizontal cable management is often applied as the 1U cable management. 1U, the acronym of one unit, stands for the height of the racks or cabinets, usually 1.75 inches. The size has been officially set as the standard vertically usable space for 1U. As its name shows, this type of management requires you to place proper managing devices on front racks or cabinets and manage Ethernet cables in a horizontal way. For the 1U horizontal cable managers, the plastic single sided horizontal cable manager with finger duct and the metal horizontal cable manager with five D-rings are the most popular types. While considering Ethernet patch panels, Cat5e patch panels, Cat6 patch panels, and blank keystone patch panels are the commonly used types.
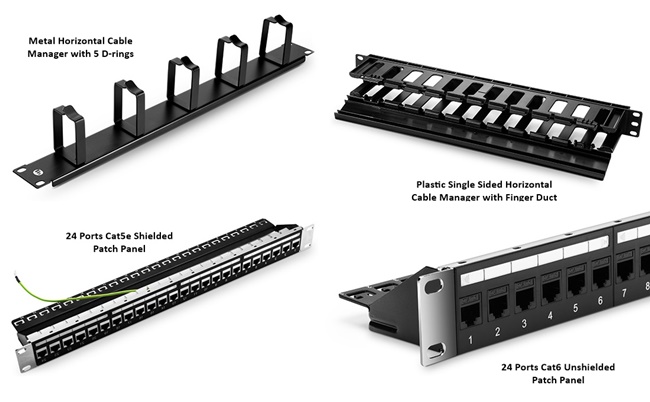
Figure 2:Horizontal Cable Management Devices
Vertical Cable Management
Comparing with the horizontal type, the vertical cable management requires you to place organizing devices, usually the cable organizers, at both sides of the racks and secure them in a vertical way. For vertical cable managers, single D-ring vertical cable manager and 5U plastic vertical manger with bend radius finger are the top two types in the market.
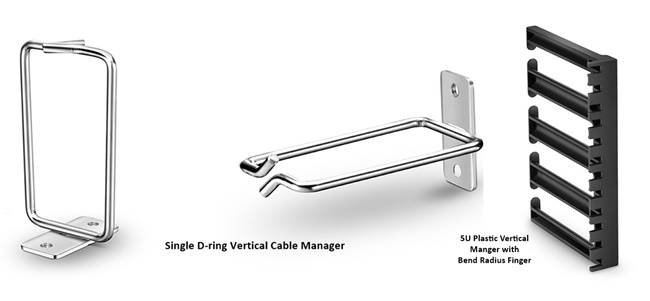
Figure 3:Vertical Cable Management Managers
Summary
In networking cabling, no matter in your homes or office buildings, the Ethernet cable management has been an irreplaceable solution to deal with messy network cables. Choosing what kind of managing method, horizontal cable management, vertical cable management, or the combination of the two types totally depends on your needs.
Guidelines for Data Center Rack Cable Management
Data center rack, as an effective solution to the increasingly higher demand for computing power and high-density network cabling in
An Overview of Data Center Rack
What is Data Center Rack
The data center rack is a kind of framework used to hold data center equipment, including servers, network switches, cables, etc. Using wisely, the server rack can keep the whole network system work in an ordered and efficient way.
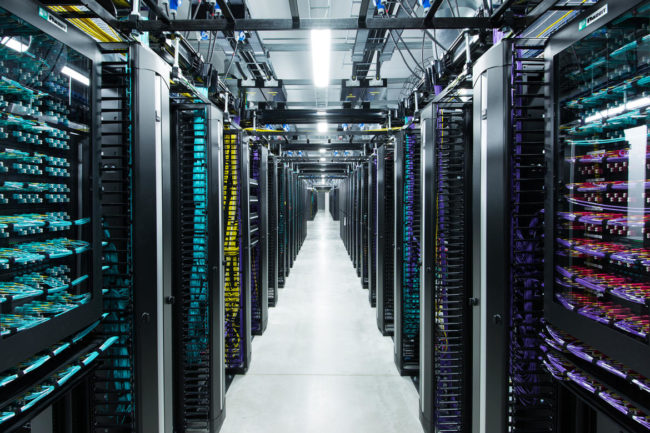
Figure 1: Data Center Racks
Types of Data Center Rack
There are many types of server racks in the market. Generally, open server rack, data center server cabinet, and wall mount rack are the most popular types.
Choosing the Right Cable Management for Your Data Center Rack
For a good cable management of data center rack, it cannot do without suitable cable managing devices. Basically, there are three major types of cable organizing devices: patch panel, horizontal cable manager, and vertical cable manager.
Patch Panel
In previous posts, many types of patch panels have been shared. As an indispensable component of cable management, the patch panel is designed to connect and manage all sort of input and output cables of devices, like switches and servers. Usually, based on the
and-Fiber-Optic-Patch-Panel-Right.jpg)
Figure 2: Ethernet Patch Panel (Left) and Fiber Optic Patch Panel (Right)
Horizontal Cable Manager
The horizontal cable manager is mostly applied in the 1U cable management, the height of data center racks of the standard unit (1.75 inches). Conventionally, it is installed in front of the server rack, ensuring cables being well-organized and protected. Altogether, there are four common types of 1U horizontal cable manager in the market: horizontal cable managers with finger duct, D-ring, brush strip, and the L-shaped horizontal cable manager.
Vertical Cable Manager
Apart from patch panel and horizontal cable manager, the vertical cable manager is another important branch of cable organizers. Similar to the horizontal type, the vertical type is also used to secure, bundle and route the cables at both sides of the server racks. However, unlike the horizontal cable manager, the vertical cable manager provides a vertical pathway for cables from switches to patch panels in the rack system. Among various vertical cable managers, 5U plastic vertical cable manager with bend radius finger, single D-ring vertical cable manager, and 45U 4.9" wide plastic vertical cable manager are the popular applications.
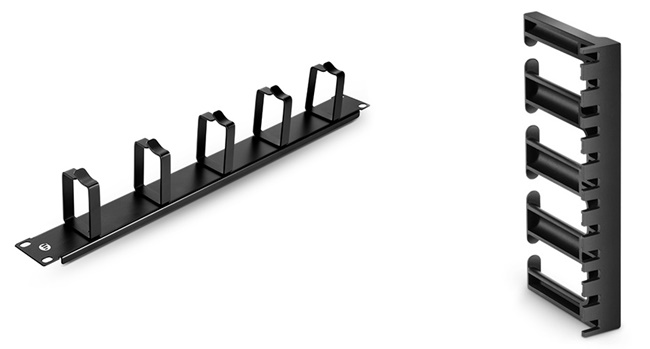
Figure 3: Horizontal Cable Manager (Left) and Vertical Cable Manager (Right)
Data Center Rack Cable Management Tips
Realizing an efficient server rack cable management, you are suggested to follow three main steps:
First, make a plan in advance. You need to have a basic idea of the quantity of the connections for cabling. Especially, a plan should be made before the installations of other network devices, such as cabinets and servers.
Second, understand industry standards. Before the cabling, another important step is to catch the industrial standards and regulations in your country or even the local area. A standard-based cabling system is a prerequisite for your effective cable management.
Third, choose the proper cable managing devices. This is the key step to ensure all connections perform well. As mentioned in the last part, there are many types of cable managing devices. You need to choose the right one conforming with your previous planning and network environment.
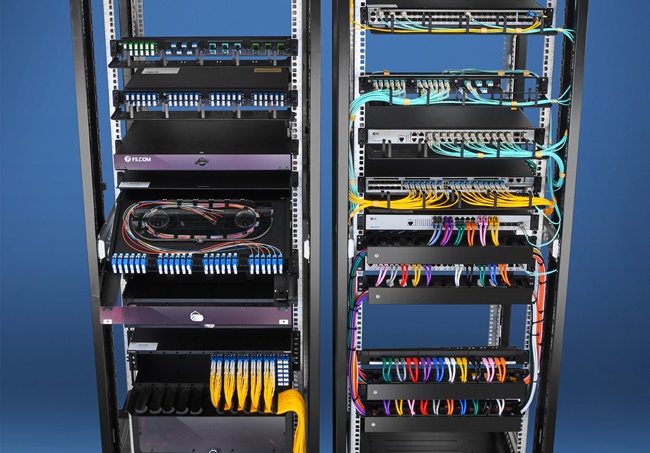
Figure 4: Server Rack Cable Management
Summary
Data center rack cable management has been a headache that has bothered many IT technicians. In fact, an effective cable management for server rack lies in a wisely use of proper cable organizing tools. In this post, the main types of managing devices have been introduced. Also, the tips for data center cable management have also been suggested.
Networking Patch Panel Wiki, Types, and Purposes
Networking patch panel has been an indispensable part in daily cabling. Whenever setting up connections for all sorts of devices, like servers and switches, you have to deal with a large number of input and output cables. Under such a circumstance, the patch panel for networking will do help to effectively manage those cumbersome cables. Then, a series of questions about patch panel in networking ensued. In this post, what a networking patch panel is and why it is needed will be answered.
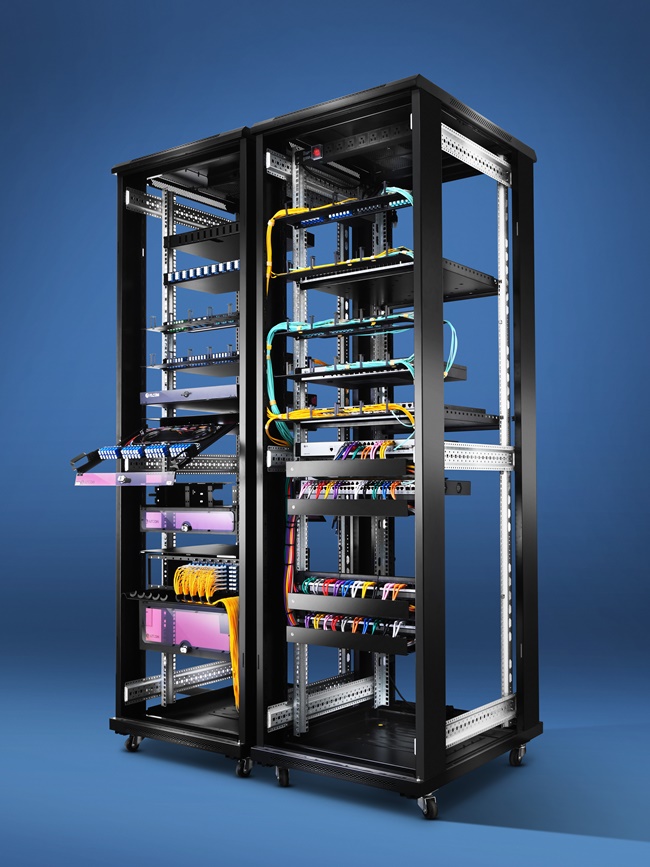
Figure 1: Network Cabling
What is the Networking Patch Panel
Networking patch panel, a kind of cable organizer, is designed to connect and manage copper or fiber optic cables coming in or out. Usually, in networking patch panel cabling, the panel will be attached to racks or enclosures in wiring closets or on walls. Then, patch cords will be used to connect ports in patch panels to ports in servers or network switches.
Types of Networking Patch Panel
Basically, according to the cables connected, there are two types of networking patch panel: Ethernet patch panel and fiber optic patch panel.
Ethernet Patch Panel
Ethernet patch panel, also called copper patch panel, provides interconnections for Ethernet applications in local area network. There are many types of Ethernet patch panels, among which Cat5e patch cable, Cat6 patch cable, and Cat6a patch cables are commonly used in network cabling. As for ports of the copper patch panel, various options also can be found, such as 24 ports and 48 ports. If you want to buy an Ethernet panel, you still have to consider its designs: shielded or unshielded, flat or angled, punch down or feed-through, and loaded or unloaded. With various options, you can always find a needed type.

Figure 2: 24 Ports Blank Keystone Ethernet Patch Panel (Left) and 24 Ports Cat6 Shielded Feed-Through Patch Panel (Right)
Fiber Optic Patch Panel
Fiber optic patch panel, the other branch of networking patch panel, is designed to organize fiber cables. Similar with Ethernet patch panels, the fiber optic patch panels also are varied in designs, such as adapter types, fiber types and fiber count. Conventionally, fiber optic patch panel is commonly used as rack mount fiber patch panel or wall mount patch panel, which also applied for the Ethernet patch panel.
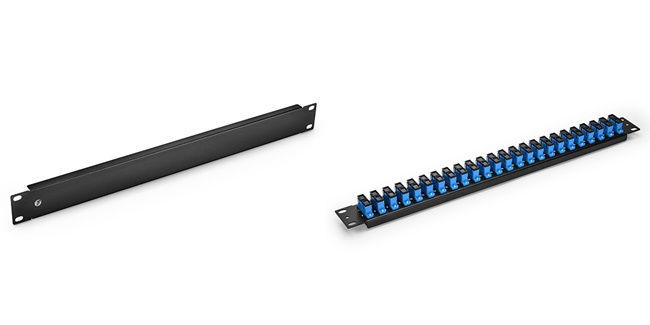
Figure 3: Blank Fiber Patch Panel (Left) and FHU 1U 48F SC Patch Panel (Right)
Benefits of Patch Panel in Networking
Knowing what the networking patch panel
First, saving time. With a patch panel in networking, changes and repairs of cables are much easier for IT technicians. They don’t need extract time to clear and identify cables.
Second, space saving. Without messy cabling, you can organize cables in a neat and orderly way. Especially, for high-density cabling, a networking patch panel can help you save a lot of space.
Third, reducing the signal interference. When cables separated in an organized way, it will greatly lower the chance for crosstalk and interference between them. As a result, the networking performance will also be enhanced greatly.
Fourth, cost reducing. With previous benefits, it will definitely bring about cost reduction. You don’t need to spend extra money on repairing, managing and future network expansion.
Summary
After revealing what the patch panel is and why it is used, it’s easy to find the networking patch panel is the best solution to manage cables, no matter in the office or home network. As we mentioned, there are various benefits of networking patch panels. However, if you want to make a full advantage of those benefits, a wise use of patch panels is needed. For detailed information about how to wisely use patch panel manage cables, you can refer to the article: Best Patch Panel Cable Management Techniques.
How to Use Cat6a Patch Panel for Network Cabling?
Cat6a patch panel, a kind of copper patch panel has been an important contributor in 10 Gigabit Ethernet for network connection. Nowadays, it has been in a widespread deployment in Ethernet network cabling. With such a great importance, it’s necessary for us to know how to terminate Cat6a patch panel.

Figure 1: Cat6a Patch Panel Cabling
An Overview of Cat6a Patch Panel
Cat6a patch panel, an improved version of the Cat6 patch panel, is also a mounted hardware assembly containing ports to connect and manage the incoming and outgoing copper cables. Supporting different kinds of Cat6a cables and
With different components, there will be corresponding subbranches of the patch panel Cat6a version. If you put ports as a selection basis, there are Cat6a patch panel 12 ports, Cat6a patch panel 24 ports, and Cat6a patch panel 48 ports.
When it comes to the design for high EMI (Electro Magnetic Interference) environments, Cat6a shielded patch panel and unshielded patch panel Cat6a version are found in the market. Moreover, options for connecting methods are also available. You can choose a punch down Cat6a patch panel or a feed-through patch panel Cat6a version.
How to Install Cat6a Patch Panel
Having an overview of the patch panel Cat6a version will be the preparation step to use Cat6a patch panel. As has mentioned in the last part, many types of this cable organizer are available in the market. Different designs come in different wiring methods. The most obvious installing difference lies between punch down Cat6a patch panel or a feed-through patch panel Cat6a version.
Punch Down Cat6a Patch Panel
For the punch down type, on its front plate, it comes in RJ45 ports to directly connect Ethernet cables. While on its rear side, the plate module is set with color markings for punching down Ethernet cables. If you are holding a patch down patch panel Cat6a version, you can follow the steps listed as below one by one:
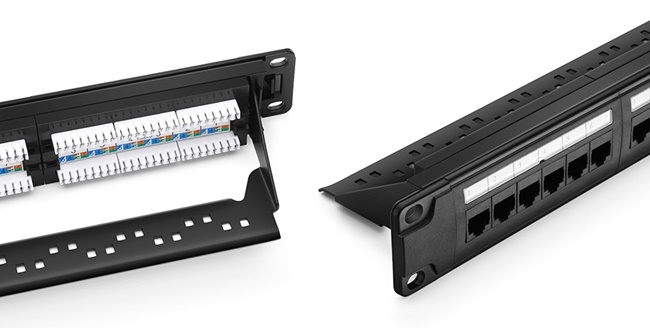
Figure 2: 24 Ports Unshielded Punch Down Patch Panel
First, strip about 3-6 inches of the outer jacket from the end of each cable with a cable stripper.
Second, separate cable wires. After removing the outer jacket, four twisted pairs of exposed wires will be found. You need to split each pair into two single wires.
Third, set all the cable wires into its own slots of the patch panel. Please note that don’t make wires exposed too much or twisted in case of the signal weakening.
Fourth, terminate each wire. Use a 110 punch down tool to press down on each wire and cut the excess wire.
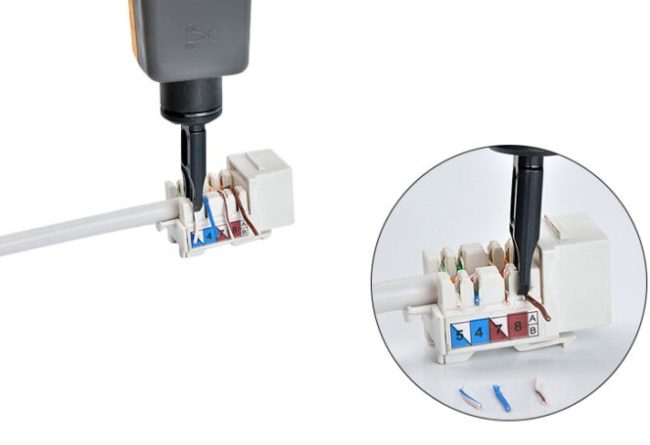
Figure 3:Using Punch Down Tool to Terminate Wires
Fifth, if there is a need, you can write specific information on labels for identification. For example, you can mark the terminated incoming cables with a label to indicate where the cable is from.
Sixth, inspect the wire. After terminating, you need to use a cable tester to check whether all the wires are terminated correctly.
Feed-through Cat6a Patch Panel
As for the feed-through Cat6a patch panel, its installation will be much easier than that of a punch down type. Since the front and the rear plates of the feed-through patch panel Cat6a version are both configured with RJ45 ports, you can directly insert all the cables into the slots of the panel. For a feed-through Cat6a patch panel, you can take the following steps:
First, hold the drawer of patch panel at the height of the layer of the rack you need to set and push it forwardly.
Second, use the appropriate machine screws to attach the patch panel assembly to the rack.
Third, insert cables into the matching port one by one. After that, you can use a strap to secure the cables.
Fourth, it’s an optional step. Similar with punch-through type, you also can write specific information on labels for identification.
Fifth, you still need to make a visual inspection to ensure the safety of all the network environment.
Conclusion
In this article, you will have a full learning of the Cat6a patch panel from its background information to user guide. As for terminating a patch panel Cat6a version, it is not so troublesome as you have imagined.
Wall Mount Patch Panel Basics and User Guide
Patch panel, an indispensable cable managing device, has been divided into
What Is Wall Mount Patch Panel?
Similar with rack mount patch panel, the wall mount patch panel is also a mounted hardware assembly containing ports to connect and manage the incoming and outgoing fiber or copper cables. The different point is that as its name shows, the wall mount patch panel is a patch panel fixed on the wall instead of in a rack. The patch panel in wall version is regarded as a perfect solution for networking and fiber distribution from the vault or wiring closet to the user’s terminal equipment.
Types of Wall Mount Patch Panel
Conventionally, based on different application environment, the wall mount patch panel is divided into wall mount fiber patch panel and wall mount Ethernet patch panel.
Wall Mount Fiber Patch Panel
For a fiber patch panel in wall mount version, it consists of two parts: the fiber adapter panel and a fiber optic wall mount enclosure. The fiber wall mount enclosure usually collocates with two or four adapter panels. Featured with its flexible and compact design, the patch panel of this type offers a perfect choice for securing and protecting fiber connections in telecommunications closets or other installation areas where wall space is limited.
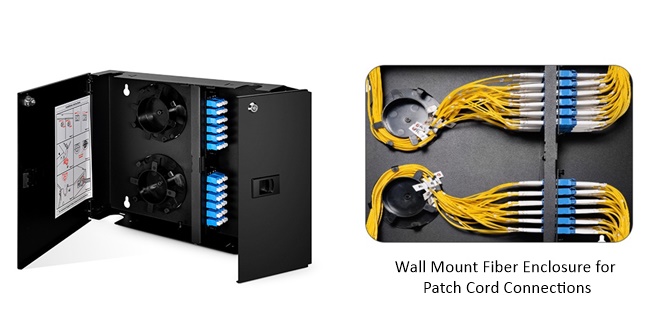
Figure 1: Wall Mount Fiber Patch Panel
Wall Mount Ethernet Patch Panel
When it comes to the wall mount Ethernet patch panel, it also involves in two units: an Ethernet path panel and a wall mount panel bracket. Sharing the same blood with the copper patch panel, the panel of this type is also used in a local area network(LAN) and supports both shielded and unshielded copper cables. In most applications, Cat5e wall mount patch panel and wall mount patch panel Cat6 version are the most favored types.
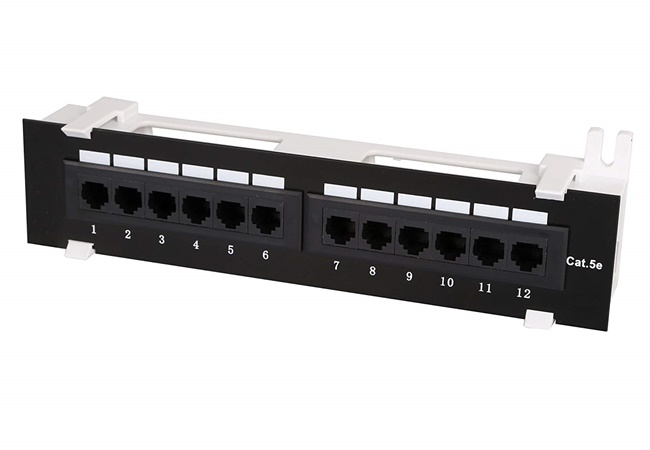
Figure 2: Cat5e Wall Mount Patch Panel
User Guide for Wall Mount Patch Panel
After knowing some basic information about the wall mount patch panel, here
Size
Here, the size does not only refer to the height, depth, width, and weight of the patch panel, but also the space for the installation of a wall mount patch panel, especially the wall mount fiber patch panel. You need to consider the space for opening and removing the doors of the enclosure.
Loaded or Unloaded
The loaded panel means it’s pre-installed with fiber adapter panels or keystone jacks. Take Cat5e patch panel as an example, it refers to the Ethernet patch panel inside the bracket has been pre-loaded with Cat5e jacks. While the unloaded type is an empty fiber panel or a wall mount keystone patch panel. With unloaded patch panels, users have to install required adapters or keystone jacks before installing the patch panel in the wall.
Conclusion
As a branch of cable management, the wall mount patch panel provides a good solution to optimize your
How to Install a Rack Mount Patch Panel?
当在标题看,尤其是单词“机架式配线架”,你会犹豫了一会儿吗?是的,我做的。我在想什么血缘关系它有一个接线板,以及是否需要进行不同的安装抓住这个机会,我们将对这些疑虑进行探索。
什么是机架安装配线架?
我们很容易理解什么是机架安装配线架。与配线架共享相同的血液,配线架机架版本也是一个安装的硬件组件,包含端口到何时需要将机架安装配线架与墙壁安装配线架,另一种配线架区分开来。当配线架与机架安装相关时,它指的是 特别 在典型的数据中心网络中使用机架或机架安装机箱的一种配线架。
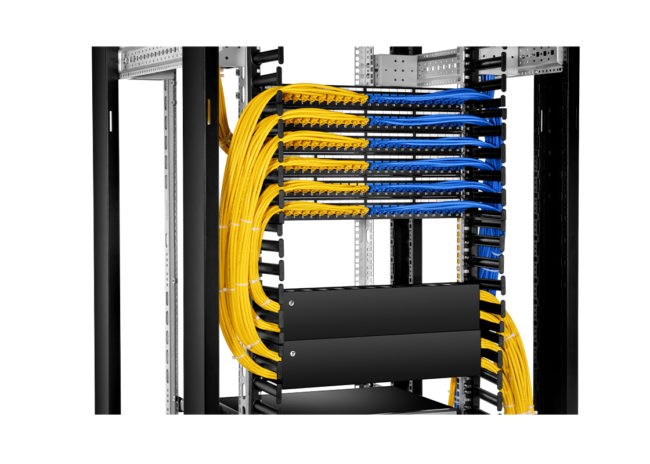
图1:机架安装接线板布线
机架安装配线架的类型
基本上,机架安装配线架由光纤配线架和用于不同应用的铜配线架组成。
对于机架安装光纤配线架,它主要是设计用于标准的19英寸机架上。根据所需连接的数量,它是在1U,2U,具有平的或成角度的设计4U配置通常可用。典型地,该齿条在部署之前或部署期间,总是有空插槽可以安装LC / SC光纤适配器面板或盒式磁带。你。
在所有这些类型中,cat6接线板是最受青睐的千兆以太网高密度布线。此外,所有这些类型的机架式铜板都可在市场上的24个端口和48个端口中使用。
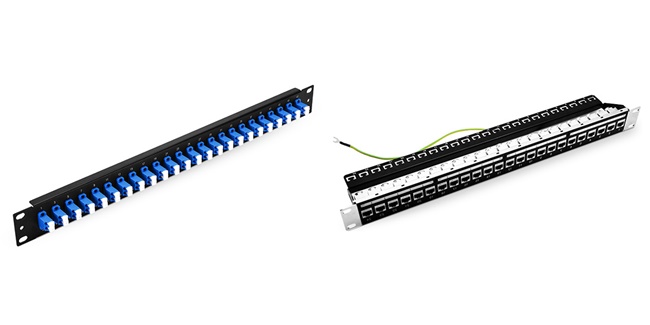
图2:24端口1 U机架安装光纤配线架(左)和24端口1 U屏蔽Cat 6机架安装配线架(右)
在机架中安装配线架的步骤
通常,用户有三个主要步骤来安装空白机架安装配线架。如果是预装机架安装 这是 持有,您可以直接从第二个安装步骤开始。
准备
Before installation, the user should evaluate how many rack units are going to be used. Then you can decide the number and the size of the patch panel. After that, you need to choose the jacks that you are going to use. Then you can install the jacks into the patch panels.
Installation
First, you can hold the drawer of patch panel at the height of the layer of the rack you need to set and push it forwardly. Then you need to use the appropriate machine screws to attach the patch panel assembly to the rack.
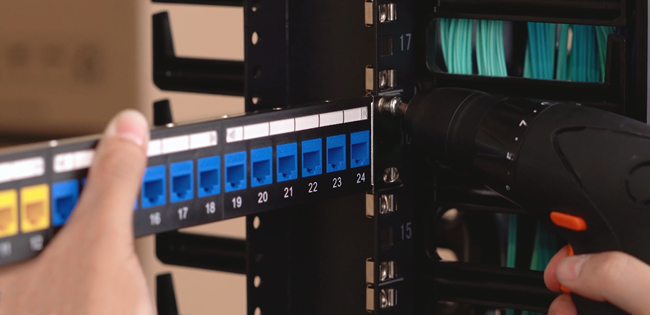
Figure 3: Installing Rack Mount Patch Panel
Second, insert cables into the matching port one by one. After that, you can use a strap to secure the cables. Typically, for fiber optical cables, we would prefer to use
第三,如果有需要,您可以在标签上写下特殊信息以便识别。
验证
完成所有这三个步骤后,即可完成安装。
结论
机架安装 配线架是最流行的解决方案在达特中心网络管理的电缆。特别是,有很多类型的机架安装配线架供选择,这已被证明是一种面向未来的管理。这是现实而明智的我们学习如何使用它。